Next, back out the changes you just made to the tableView:didSelectRowAtIndexPath: method by
deleting the lines you added in the preceding section (be careful to not
remove the call to deselectRowAtIndexPath).Now, let’s wrap this app up properly. This means we have to add a
UINavigationController to the
application. If you’ve used many iPhone apps, you’ll be familiar with this
interface; it’s one of the most commonly used iPhone design interface
patterns. Clicking on a cell in the table view makes the current view
slide to the left and a new view is displayed. You return to the original
table view by clicking on the Back button.
The first thing you need to do is add an IBOutlet to a UINavigationController to the app delegate
interface (CityGuideDelegate.h):
#import <UIKit/UIKit.h>

@class RootController;

@interface CityGuideDelegate : NSObject <UIApplicationDelegate> {
    UIWindow *window;
    RootController *viewController;
    NSMutableArray *cities;
    UINavigationController *navController;
}

@property (nonatomic, retain) IBOutlet UIWindow *window;
@property (nonatomic, retain) IBOutlet RootController *viewController;
@property (nonatomic, retain) IBOutlet UINavigationController *navController;
@property (nonatomic, retain) NSMutableArray *cities;

@end
You also need to make some modifications to the app delegate
implementation (CityGuideDelegate.m). Add a new line
of code near the top to @synthesize the
new property:
@synthesize window;
@synthesize viewController;
@synthesize cities;
@synthesize navController;
Now you need to replace the section of the code that adds the
RootController main view as a subview
of the main window. Delete the following line from the bottom of the
applicationDidFinishLaunching:
method:
[window addSubview:viewController.view];
Next, replace it with the code shown in bold in the following code
snippet. This new code adds the RootController to the NavController’s stack of view controllers,
making its view the current view of the NavController. Then it sets the current NavController view as the subview of the main
window. The end of the applicationDidFinishLaunching: method should
look like this now:
    // Override point for customization after app launch
    navController.viewControllers = [NSArray arrayWithObject:viewController];
				    [window addSubview:navController.view];
    [window makeKeyAndVisible];
}
As the current view of the NavController changes, it will automatically
update the subview of the main window, and thus what the user sees on his
screen. Let’s get this working first, and afterward I’ll discuss exactly
how the NavController manipulates its
stack of views.
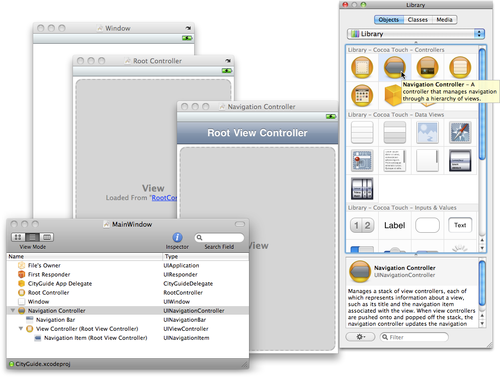
Open the MainWindow.xib file in Interface
Builder and drag and drop a navigation controller (UINavigationController) into the main NIB window
(titled “MainWindow” or “MainWindow.xib”). The navigation controller is
found on the Library (⌘-Shift-L) under Cocoa Touch→Controllers.
After doing so, you should see something similar to Figure 1. Note the navigation
bar that appears at the top (with the title “City Guide”).
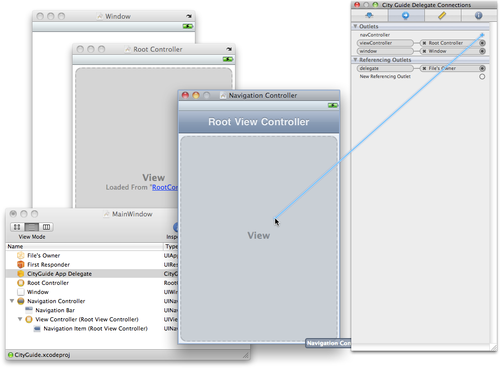
After adding the UINavigationController to the NIB, click on the
CityGuide App Delegate icon in the main NIB window and switch to the
Connections pane (⌘-2) of the Inspector window. Connect the navController outlet to the UINavigationController, as shown in Figure 5-15.
After performing this step, save the NIB file and return to Xcode.
Open the RootController.m file and add the following
snippet at the top of the viewDidLoad:
method:
self.title = @"City Guide";
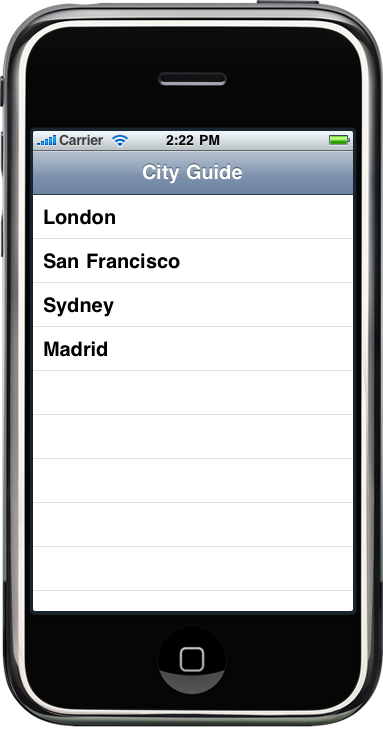
We’ve reached another good time to take a break, so click Build and
Run. If you’ve followed all the steps, you should see what I see,
something that looks a lot like Figure 3.